


Table of contents
- What Is Selenium Grid?
- How Selenium Grid Works?
- What Is A Hub In Selenium Grid?
- What Are Nodes in Selenium Grid?
- Selenium Grid Setup & Prerequisites
- Configuring A Selenium Hub
- Configuring Nodes For Selenium Grid
- Run Selenium Grid For Parallel Automation Testing
- Using LambdaTest Cloud Selenium Grid For Automation Testing
- Running The Earlier Test Over LambdaTest Selenium Grid
- Conclusion
Unlike Selenium WebDriver which allows you automated browser testing in a sequential manner, a Selenium Grid setup will allow you to run test cases in different browsers/ browser versions, simultaneously.
One of the reasons behind the huge popularity of Selenium is its capability to automate cross browser testing. And Selenium Grid has by far been the most useful component of the Selenium project. Why? Well, there was a major challenge with Selenium until Selenium Grid was introduced.
Earlier, you could only load a handful of different browsers on your local machine. So if you had a windows machine, you couldn’t test on Safari browsers. Similarly, if you had a Mac machine then you couldn’t test on IE or Edge browsers. In addition, running tests on a single machine was a time-consuming process. Also, if you have multiple computers, why test on a single one at a time?
The ideal scenario would be to test on a network of interconnected machines having different browser environments running multiple tests cases concurrently, in parallel, and reducing the overall testing time by multiple folds. And here I am also including time taken for cross browser testing as well.
This is exactly why Selenium Grid is built. It can help you test on all major browsers, all major operating systems, and even on mobile device browsers. You can get a huge browser coverage in all your functional tests ensuring the perfect experience for a wide range of your potential users.
This cypress test automation tutorial will help you learn the benefits of Cypress automation, and how to install Cypress and execute Cypress automation testing.
What Is Selenium Grid?
Before we start with what is Selenium Grid, it is necessary to realize the basics of a Selenium Grid. Selenium Grid allows parallel testing against various browsers & OS combinations through a Client-Server model. Here, the Server is known as the Hub which has multiple Clients to interact with.
With Selenium Grid, you can connect a server to multiple remote machines which can then be used to run a browser automation script over multiple browser + OS configurations, simultaneously.
Selenium Grid 3 has been deprecated and the official Selenium documentation recommends using the Selenium Grid 4.
How Selenium Grid Works?
Selenium Grid is comprised of two concepts:
Hub
Nodes
What Is A Hub In Selenium Grid?
It is the center of the Selenium Grid architecture that manages the network of the test machines. There is only one hub in a network which is assigned to a test of DesiredCapabilities(operating system, browser, browser versions) and then the hub finds the test that matches the given configurations. A Selenium Hub is referred as the server.
What Are Nodes in Selenium Grid?
Nodes are the test machines that execute the test that was earlier loaded on the hub. There can be multiple nodes configured with a different operating system and different browsers. It is not mandatory for the node to run on the same platform on which the hub is running. Selenium nodes are referred as clients connected to a server i.e. a Hub.

Infrastructure to configuring a Selenium Grid setup for parallel execution involves just two steps.
Step 1: Creating a hub.
Step 2: Defining the nodes and connecting to that hub.
Selenium Grid Setup & Prerequisites
You would have to make sure that your system has Java Runtime Environment (JRE) or better yet Java Development Kit (JDK) installed. Though most people recommend going for the latest JDK, I prefer an earlier tried and tested versions like JDK SE 08 or 09. You can go for the latest one if you wish.
Download and extract Selenium Standalone server JAR files. You can download them from here.
Configuring A Selenium Hub
The first step of a Selenium Grid setup would be to create a hub. Open a command prompt or terminal and navigate to the directory where the Selenium Standalone Server jar file is saved. Run the below command.
java -jar selenium-server-standalone-3.141.59.jar -role hub
This command would launch a Selenium Grid hub on port 4444 by default. You can also check the same by directing to localhost:4444/grid/console.
Configuring Nodes For Selenium Grid
Since the Hub has already been created, the next step to Selenium Grid setup for parallel execution would involve launching a node. You start with going to the other machines where we want to setup nodes. Again, these machines should have a JDK/JRE setup.
In the node machine, open a command prompt or terminal and navigate to the directory where you have saved the browser driver files.
Configuring ChromeDriver In Selenium Grid Setup
Enter the below command in order to configure Chrome driver in your Selenium Grid setup for parallel execution.
java -Dwebdriver.chrome.driver="C:\chromedriver.exe" -jar
selenium-server-standalone-3.141.59.jar -role webdriver -hub
[http://10.0.0.22:4444/grid/register](http://10.0.0.22:4444/grid/register) -port 4546
Note: In the above command I have used my machine IP along with the port 4444 where the hub is actually running. I have also selected the port 4546 where I want my node to get registered. You can opt for any free port for registering the node.
Similarly, you can register other nodes for other browsers. For example, here’s how you can configure Firefox(Gecko) driver and Internet Explorer driver to your Selenium Grid setup for parallel execution.
Configuring Firefox(Gecko) Driver In Selenium Grid Setup
java -Dwebdriver.gecko.driver="C:\geckodriver.exe" -jar
selenium-server-standalone-3.141.59.jar -role webdriver -hub
[http://10.0.0.22:4444/grid/register](http://10.0.0.22:4444/grid/register) -port 5566
Configuring IE(Internet Explorer) Driver In Selenium Grid Setup
java -Dwebdriver.ie.driver="C:\IEDriverServer.exe" -jar
selenium-server-standalone-3.141.59.jar -role webdriver -hub
[http://10.0.0.22:4444/grid/register](http://10.0.0.22:4444/grid/register) -port 4547
Note: Please make sure that you select different ports for different nodes to connect with the single hub running on port 4444. Also, before running your test on IE, make sure that the browser zoom is exactly 100% otherwise it might show an error.
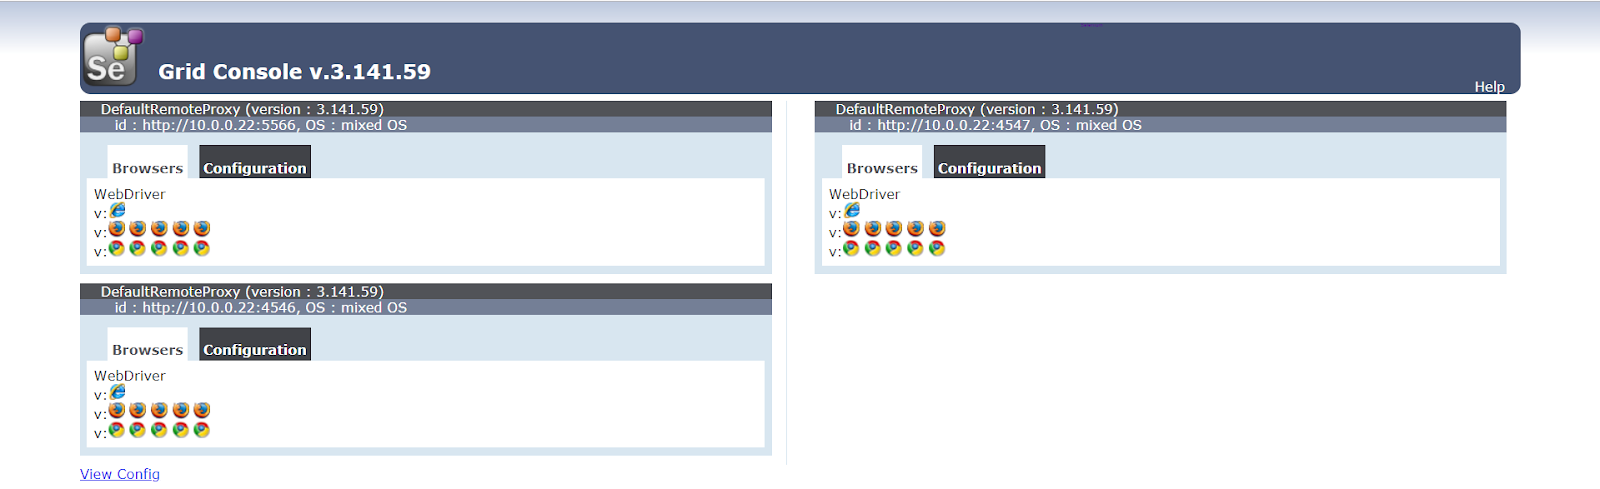
You can notice by above commands that we are running our first node for chrome driver on port 4546, the second node for firefox driver is running on port 5566, and the third node for IE browser is running on port 4547. Here is the output screenshot for further reference:
Now, that we have our Selenium Grid setup configured, your next step is to perform Selenium automation testing for your cross browser testing suite.
This Playwright automation tutorial will guide you through the setup of the Playwright framework, which will enable you to write end-to-end tests for your future projects.
Run Selenium Grid For Parallel Automation Testing
It is time for some automated cross browser testing! I will be running an automation script demonstrating the Selenium testing Grid for parallel execution. This script would run in parallel on Chrome, Firefox, and Internet Explorer which are registered on different ports and attached to a single hub.
Here is the sample code I used to perform automation testing with Selenium Grid for parallel execution in different browsers.
package DemoAutomation;

import java.net.MalformedURLException;
import java.net.URL;
import java.util.concurrent.TimeUnit;

import org.openqa.selenium.By;
import org.openqa.selenium.Platform;
import org.openqa.selenium.WebDriver;
import org.openqa.selenium.ie.InternetExplorerDriver;
import org.openqa.selenium.remote.CapabilityType;
import org.openqa.selenium.remote.DesiredCapabilities;
import org.openqa.selenium.remote.RemoteWebDriver;
import org.testng.annotations.AfterMethod;
import org.testng.annotations.BeforeMethod;
import org.testng.annotations.DataProvider;
import org.testng.annotations.Parameters;
import org.testng.annotations.Test;


public class Selenium_MultiBrowser_Test
{
    WebDriver driver;
    String nodeURL;

    @Parameters({"Port"})
    @BeforeMethod()
    public void setUp(String Port) throws MalformedURLException
    {
        if(Port.equalsIgnoreCase("4546"))
        {
            nodeURL = "http://10.0.0.22:4546/wd/hub";
            System.out.println("Chrome Browser Initiated");
            DesiredCapabilities capabilities = DesiredCapabilities.chrome();
            capabilities.setBrowserName("chrome");
            capabilities.setPlatform(Platform.WINDOWS);

            driver = new RemoteWebDriver(new URL(nodeURL),capabilities);

            driver.get("https://www.apple.com/");
            driver.manage().window().maximize();
            driver.manage().timeouts().implicitlyWait(10, TimeUnit.SECONDS);
        }

        else
            if(Port.equalsIgnoreCase("5566"))
            {
                nodeURL = "http://10.0.0.22:5566/wd/hub";
                System.out.println("Firefox Browser Initiated");
                DesiredCapabilities capabilities1 = DesiredCapabilities.firefox();
                capabilities1.setBrowserName("firefox");
                capabilities1.setPlatform(Platform.WINDOWS);

                driver = new RemoteWebDriver(new URL(nodeURL),capabilities1);

                driver.get("https://www.apple.com/");
                driver.manage().window().maximize();
                driver.manage().timeouts().implicitlyWait(10, TimeUnit.SECONDS);
            }

        else

        if(Port.equalsIgnoreCase("4547"))
        {
            nodeURL = "http://10.0.0.22:4547/wd/hub";
            System.out.println("Internet Browser Initiated");
            DesiredCapabilities capabilities2 = DesiredCapabilities.internetExplorer();
            capabilities2.setBrowserName("internet explorer");
            capabilities2.setCapability(InternetExplorerDriver.INTRODUCE_FLAKINESS_BY_IGNORING_SECURITY_DOMAINS, true);
            capabilities2.setCapability(InternetExplorerDriver.IGNORE_ZOOM_SETTING, true);
            capabilities2.setCapability(CapabilityType.ACCEPT_SSL_CERTS, true);
            capabilities2.setCapability("ignoreProtectedModeSettings", true);
            capabilities2.setCapability("nativeEvents", false);
            capabilities2.setCapability(InternetExplorerDriver.INITIAL_BROWSER_URL, "");
            capabilities2.setCapability(InternetExplorerDriver.LOG_LEVEL, "DEBUG");


            capabilities2.setPlatform(Platform.WINDOWS);

            driver = new RemoteWebDriver(new URL(nodeURL),capabilities2);

            driver.get("https://www.apple.com/");
            driver.manage().window().maximize();
            driver.manage().timeouts().implicitlyWait(10, TimeUnit.SECONDS);
        }
    }

    @Test
    public void appleSite() throws InterruptedException
    {
        try
        {

        driver.findElement(By.xpath("//*[@id=\'ac-globalnav\']/div/ul[2]/li[3]")).click();
        Thread.sleep(2000);

        driver.findElement(By.cssSelector("#chapternav > div > ul > li.chapternav-item.chapternav-item-ipad-air > a > figure")).click();
        Thread.sleep(2000);

        driver.findElement(By.linkText("Why iPad")).click();
        Thread.sleep(2000);
        }

        catch(Exception e)
        {
            System.out.println(e.getMessage());
        }
    }


    @AfterMethod()
    public void tearDown()
    {
            driver.quit();
            System.out.println("Browser Closed");
    }
}
Above is the java class file that is configured with the XML file which includes the values of parameters passed in the java file and also helps in creating a suite of different classes that would run in a parallel manner.
<?xml version="1.0" encoding="UTF-8"?>
<!DOCTYPE suite SYSTEM "http://testng.org/testng-1.0.dtd">
<suite thread-count="3" name="BlogSuite" parallel="tests">

<test name="Chrome Test">
<parameter name="Port" value="4546"/>
    <classes>
      <class name="DemoAutomation.Selenium_MultiBrowser_Test"/>

    </classes>
  </test>

  <test name="Firefox Test">
<parameter name="Port" value="5566"/>
    <classes>
      <class name="DemoAutomation.Selenium_MultiBrowser_Test"/>

    </classes>
  </test>


  <test name="Internet Explorer Test">
<parameter name="Port" value="4547"/>
    <classes>
      <class name="DemoAutomation.Selenium_MultiBrowser_Test"/>

    </classes>
  </test>


  </suite>
Output Screen:
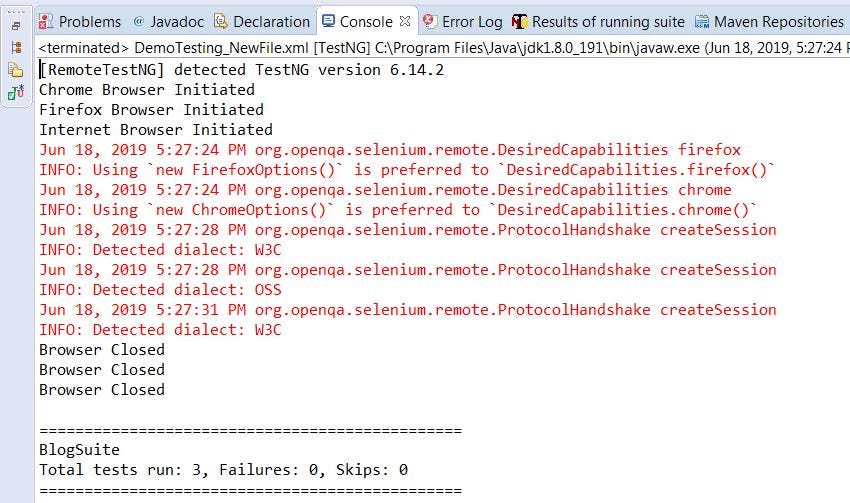
In the above code, I have used DesiredCapabilities class that would help you set properties for the Selenium WebDriver. These properties can be used to configure instances of browsers such as BrowserName and BrowserVersion on which you want your script to run.
Note: However, the script would only run on the browser and browser version that is currently installed on the test machine. Suppose, if you try running your test on Chrome 72 and you only have Chrome 74 installed on your test machine, then your script would show an error. This same scenario occurs while you opt for the different operating system compared to the operating system of your test machines.
In addition, it is quite expensive to invest in new Mac and Windows environments every time a new OS is launched.
So, if you wish to perform automated cross browser testing on different browsers, browser versions and operating systems then I would recommend you look for a tool that offers Selenium Grid setup on-cloud, such as LambdaTest.
LambdaTest saves you from the hassle of maintaining your Selenium Grid setup, so you could focus on writing better automation code. LambdaTest also empowers you with that ability of Selenium Grid for parallel execution, all on the cloud.
Using LambdaTest Cloud Selenium Grid For Automation Testing
LambdaTest is a cross browser testing platform on the cloud which allows you to test your website/ web application across 3000+ combinations of browsers, browser versions, and operating systems.
LambdaTest offers a cloud Selenium Grid to help you automate browser testing in parallel. You could also integrate your LambdaTest account with numerous CI/CD tools, project management tools, codeless automation tools etc. for faster go-to-market launch. Check out all of the LambdaTest integrations.Even perform live interactive real time cross browser testing, responsive testing of your web app/ website as well.
Running The Earlier Test Over LambdaTest Selenium Grid
Let’s try running our same test case on LambdaTest Selenium Grid. You can use LambdaTest Desired Capabilities Generator for configuring the desired capabilities object. This would save you a lot of your time spent in Selenium Grid setup when done manually.
With LambdaTest, you only need to create a Remote Server, add your LambdaTest username, access key, and the Grid URL in your script, and then you are good to go.
Below is the Java code in the TestNG framework that would be more beneficial in this scenario:
package lambdatest;
import java.net.MalformedURLException;
import java.net.URL;

import org.openqa.selenium.By;
import org.openqa.selenium.JavascriptExecutor;
import org.openqa.selenium.remote.DesiredCapabilities;
import org.openqa.selenium.remote.RemoteWebDriver;
import org.testng.annotations.AfterTest;
import org.testng.annotations.BeforeTest;
import org.testng.annotations.Test;


public class SampleTest {
   public String username = "enteryourusernamehere";
  public String accesskey = "enteryourkeyhere";
  public RemoteWebDriver driver = null;
  public String gridURL = "@hub.lambdatest.com/wd/hub";
  boolean status = false;

  @BeforeTest
  @org.testng.annotations.Parameters(value={"browser","version","platform"})
  public void setUp(String browser, String version, String platform) throws Exception {
     DesiredCapabilities capabilities = new DesiredCapabilities();
      capabilities.setCapability("browserName", browser);
      capabilities.setCapability("version", version);
      capabilities.setCapability("platform", platform); // If this cap isn't specified, it will just get the any available one
      capabilities.setCapability("build", "Selenium Grid");
      capabilities.setCapability("name", "Sample Test");
      capabilities.setCapability("network", true); // To enable network logs
      capabilities.setCapability("visual", true); // To enable step by step screenshot
      capabilities.setCapability("video", true); // To enable video recording
      capabilities.setCapability("console", true); // To capture console logs
      try {
          driver = new RemoteWebDriver(new URL("https://" + username + ":" + accesskey + gridURL), capabilities);
      } catch (MalformedURLException e) {
          System.out.println("Invalid grid URL");
      } catch (Exception e) {
          System.out.println(e.getMessage());
      }
  }

  @Test
  public void testSimple() throws Exception {
     try {

            driver.get("https://www.apple.com/");
            driver.manage().window().maximize();

            driver.findElement(By.xpath("//*[@id=\'ac-globalnav\']/div/ul[2]/li[3]")).click();
            Thread.sleep(2000);

            driver.findElement(
            By.cssSelector("#chapternav > div > ul > li.chapternav-item.chapternav-item-ipad-air > a")).click();
            Thread.sleep(2000);

            driver.findElement(By.linkText("Why iPad")).click();
            Thread.sleep(2000);

      } catch (Exception e) {
          System.out.println(e.getMessage());
      }
  }


  @AfterTest
  public void tearDown() throws Exception {
     if (driver != null) {
          ((JavascriptExecutor) driver).executeScript("lambda-status=" + status);
          driver.quit();
      }
  }
}
Now, we would run this Java class file with the XML file that contains the value of parameters passed in the Java file and also helps in creating a suite of different classes, using which, we can perform test automation for parallel execution on different configurations.
<?xml version="1.0" encoding="UTF-8"?>
<!DOCTYPE suite SYSTEM "http://testng.org/testng-1.0.dtd">
<suite thread-count="3" name="BlogSuite" parallel="tests">

  <test name="FirefoxTest">
  <parameter name="browser" value="firefox"/>
  <parameter name="version" value="62.0"/>
  <parameter name="platform" value="WIN8"/>
    <classes>
      <class name="lambdatest.SampleTest"/>
    </classes>
  </test>

  <test name="ChromeTest">
  <parameter name="browser" value="chrome"/>
  <parameter name="version" value="70.0"/>
  <parameter name="platform" value="WIN10"/>
    <classes>
      <class name="lambdatest.SampleTest"/>
    </classes>
  </test>

  <test name="SafariTest">
  <parameter name="browser" value="safari"/>
  <parameter name="version" value="11.0"/>
  <parameter name="platform" value="macos High Sierra"/>
    <classes>
      <class name="lambdatest.SampleTest"/>
    </classes>
  </test>

</suite>
Output Screen:
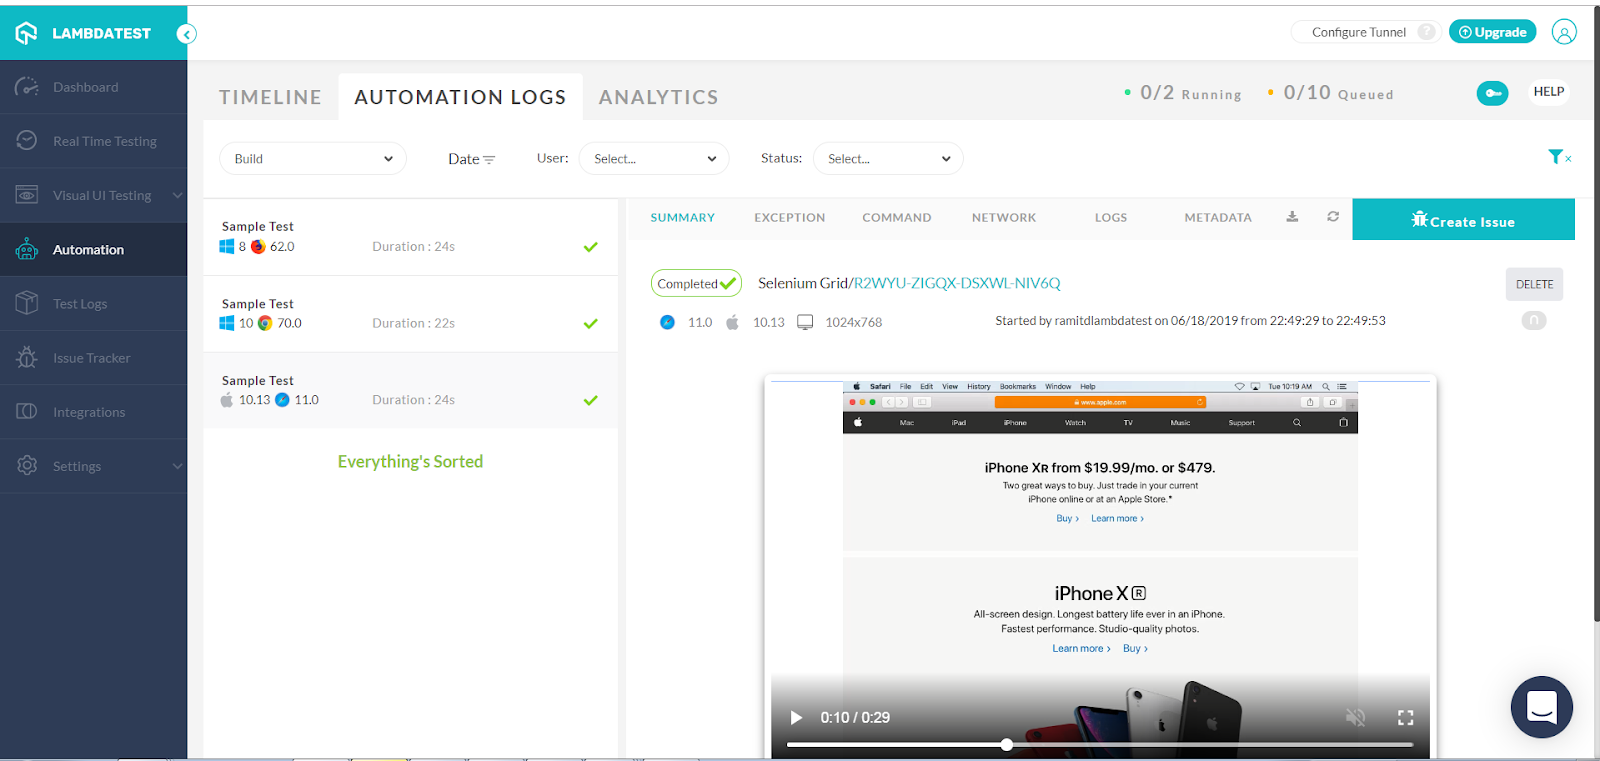
Now, we have successfully executed automation testing with Selenium Grid for parallel execution on different browsers along with different operating systems without any hassle of creating a hub and launching the nodes on different ports. While the test is running on a Selenium test Grid, you can see the live video streaming of your tests and various other details such as commands which includes the screenshot of each command passed by your script and also the logs and exceptions raised.
You can also create your own team and run your automated cross browser compatibility testing scripts as a team. These test results would be visible to each member added to a team. In addition through our single click integration, your teammates can log any bug found during their cross browser testing session directly to various project management platforms like Jira, Trello, Asana, Mantis, GitHub, etc. In addition, LambdaTest also integrates with CI/CD platforms that are complementary to your automation testing tools like CircleCI, Jenkins, TravisCI, etc. Check out all of the LambdaTest integrations.
Now, perform test automation cloud on the most powerful cloud infrastructure. Leverage LambdaTest automation testing for faster, reliable and scalable experience on cloud.
Conclusion
Selenium Grid setup, if done manually, could be challenging. If the main purpose of Selenium testing Grid is to run tests in parallel and test on a different configuration, you can perform the same on LambdaTest without investing time and resources on creating hub and nodes. So, give it a try once by running your automated tests on this online Grid and let us know in the comment box about your feedback using LambdaTest. Happy Testing! 🙂